Step 1: Measure up from sill the blind length on each side of window and mark on wall where top of wood blind bracket should be mounted.
Step 2: Mount blind to front of window so that front edge of closed bracket is 1/8" inside window. This allows you to rest the arch on the blind head rail.
Step 3: Install blind and check to see that it is level in the window.
Step 4: Check with customer to determine what is the desired angle the slats should be set to prior to installing the arch. Usually setting them at a right angle to the incoming sunlight is best.
Note: Slats move only on sunburst arches.
Step 5: Rest arch on head rail and center arch in window side to side and secure arch in predrilled holes on both sides.
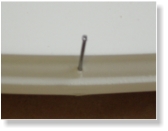
Step 6: Secure arch to wall with #4 finish nails as needed. The nails should go through the center of the decorative edge as shown in the photo below.
Step 7: Attach valance with heavy duty Velcro lining up valance with any nearby windows.
Step 8: On larger arches some walls are crooked and the gap should be filled in with caulking. We recommend adhesive white caulk found in a red tube for about two dollars.
Note: Stand-alone arches are mounted the same way as extended arches that are above blines or shutters.