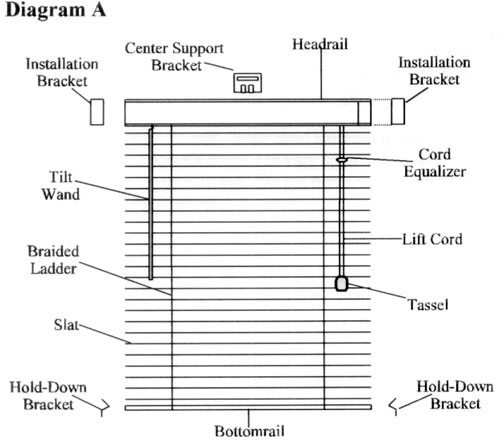
Get acquainted with your blind components and terms prior to installing. Treat your blinds with care beginning with the installation (See Diagram A.). Suggested tools needed to complete the installation are: Pencil; Slotted or 1/4" Nut Screw Driver; Hand or Electric Drill; 3/32" Bit; Level; and Measuring Tape.
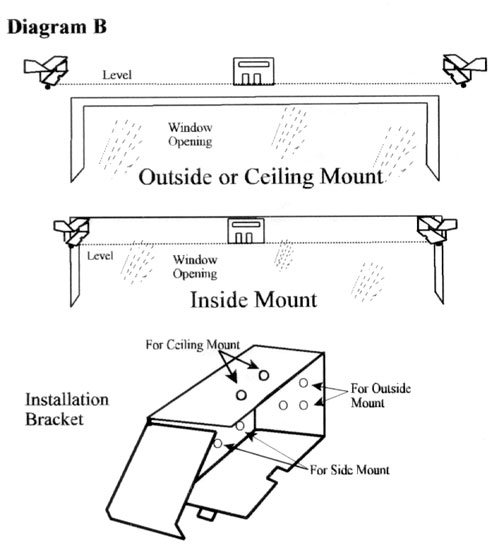
Inside, Outside or Ceiling Mount: Your blind has been produced exactly to your width specifications to fit inside or outside your window frame. Length specifications can vary up to 3/4" longer. Blinds tilt properly when raised and locked with the bottomrail freely hanging above the window sill. Do not drill holes into the mounting surface. Start the screws through the bracket into the mounting surface. (See Diagram B.)
INSTALLATION
1. Place the headrail of the blind where you desire to mount it. Raise or lower the headrail to clear any obstructions. Make sure that the headrail is level. Once it is properly positioned, pencil a reference mark at each end of the headrail.
2. Mount the end brackets. Each blind comes with 2 brackets and 4 screws. Brackets are marked left and right. On outside or ceiling mounts, brackets should be spaced an additional 1/4" on each side of the headrail. Place brackets at the reference mark and mark the screw holes with a pencil. Select diagonal (i.e., right top, left bottom) holes to assure a secure installation and avoid splitting the window frame. Space center support brackets evenly along the width of the blind. Line- up the top of the center support bracket with the top of the end brackets, mark for screws. Insert and tighten screws through all brackets, making sure the brackets are straight and level. (See Diagram B).
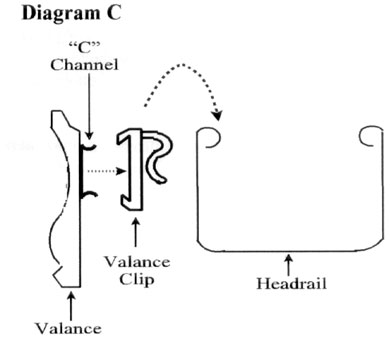
3. The following should be done prior to the final installation of the blind: The valance will be attached with valance clips that must be inserted on the headrail at this point. The valance clips will either: attach to a “C” channel that is stapled to the back of the valance; or the valance will fit into the valance clips. The hidden valance clips that attach to a channel must be positioned properly on the blinds to align with the “C” channels positioned on the back of the valance (See Diagram C). Slide the top part of the channel into the clip and snap into place.
4. Mount the blind by sliding the headrail into the brackets. Press the front hinged cover plate of the installation brackets until it snaps in place.
5. To install the valance: attach the clips to the channel that is stapled to the back of the valance. Insert the valance into the clips.
6. If hold down brackets were requested the brackets should be installed after the blind has been hung. Release blind to full length and mark each side of the blind directly across from the hold down pin in the bottomrail. Make sure that marks are level. Place top of hold down bracket at mark, screw the brackets to the mounting surface. Pull blind down and slip the pins into the brackets and bottomrail.